
Table of Contents
Greetings to all! I trust you’re doing well. In this post, I’m excited to explore the process of setting up User Authentication in a Next.js 13 App using NextAuth.
Introduction to NextAuth.js
NextAuth.js is an open-source authentication library designed to simplify the process of adding robust security measures to web applications. Tailored initially for Next.js, a renowned React-based framework, NextAuth boasts versatility, making it compatible with various frameworks and libraries.
Pros and Cons of using NextAuth.js

Every technological choice comes with its own set of benefits and drawbacks. In this section, we’ll delve into both the advantages and limitations of NextAuth, equipping you with the insights needed to determine whether it aligns with the authentication needs of your React project.
Advantages of NextAuth.js:
- Diverse Authentication Support: NextAuth.js easily integrates with various providers like Google, Facebook, Twitter, and GitHub, sparing developers from crafting custom authentication systems.
- User-Friendly Setup: Built-in sessions and tokens simplify user authentication and access control, with customization options for login pages, redirects, and data management.
- Security Focus: NextAuth.js includes safeguards against common attacks (e.g., CSRF, XSS) and offers configurable session settings for added security.
Disadvantages of NextAuth.js:
- Limited for Complex Needs: Complex applications requiring fine-grained authentication control or integration with existing identity systems may find NextAuth.js less flexible.
- Customization for Advanced Features: Advanced features like multi-factor authentication might demand custom code, increasing development effort.
- No Absolute Security Guarantee: While NextAuth.js provides robust security, it can’t guarantee absolute protection. Adhering to security best practices remains vital.
Enhancing Next.js page security often involves server-side measures like favoring cookies over Local Storage and integrating JSON Web Tokens (JWTs) validation within client-side code.
With NextAuth, you can establish robust user authentication in your Next.js 13 App in under an hour. This guide covers custom email and password authentication, seamless GitHub OAuth integration, and key aspects of user session management.
Prerequisites:
The only requirement for this endeavor is a foundational knowledge of React.js and Next.js. Even if you’re using the most recent Next.js 13 App directory, rest assured that I’ll provide thorough guidance for each step, guaranteeing a smooth journey.
Here is a little demo of the project, that we are going to build:
Demo Link of the Project: (User Authentication in Next.js 13 App with NextAuth)
Create a new Next.js-13 Project
Let’s begin by establishing a new Next.js-13 App. Open your terminal, navigate to your desktop, and initiate a fresh project with the following command:
npx create-next-app@latest nextauth-projectOnce your project is created, the next step is to install the `next-auth` package. To do this, execute the following command:
npm install next-authAfter installation, open your project in your preferred development environment, such as VsCode IDE.
Now, within the “app” folder, you’ll find the “page.tsx” and “layout.tsx” files. Remove any unnecessary code and replace it with the provided code snippets below.
Inside the page.tsx file:
export default async function Home() {
  const session = await getServerSession(options)

  return (
    <>
        <h1 className="text-5xl text-red-600 font-semibold">
        You are Not Authenticated !!
      </h1>
    </>
  )
}Inside the layout.tsx file:
import "./globals.css";
import { Inter } from "next/font/google";

const inter = Inter({ subsets: ["latin"] });

export const metadata = {
  title: "NextAuth Tutorial- By NextjsDev",
  description: "User Authentication in Next.js 13 App using NextAuth",
};

export default function RootLayout({
  children,
}: {
  children: React.ReactNode;
}) {
  return (
    <html lang="en">
      <body className={inter.className}>
        <main className="flex justify-center items-start p-6 min-h-screen">
          {children}
        </main>
      </body>
    </html>
  );
}Additionally, clear all CSS from the “globals.css” file and modify it to resemble the example given below.
Inside globals.css file:
@tailwind base;
@tailwind components;
@tailwind utilities;Dark mode in Next-js-13 App using Tailwind CSS: Ultimate Guide.
Setting Up Authentication with NextAuth.js
First, we need to create two folders inside the Api folder which is inside the App folder.
- auth folder
- […nextauth] folder
After creating the two folders create two files inside the […nextauth] folder.
- route.ts (It is a specially reserved filename for creating an api route)
- options.ts (We will provide the options for NextAuth)
Now write the below code inside the route.ts file :
import NextAuth from "next-auth";
import {options} from './options'

const handler = NextAuth(options);

export{handler as GET, handler as POST};Similarly Inside the options.ts file:
import type { NextAuthOptions } from 'next-auth'
import GitHubProvider from 'next-auth/providers/github'
import CredentialsProvider from 'next-auth/providers/credentials'

export const options: NextAuthOptions = {
    providers: [

        GitHubProvider({
            clientId: process.env.GITHUB_ID!,
            clientSecret: process.env.GITHUB_SECRET!,
        }),

        CredentialsProvider({
            name: "Credentials",
            credentials: {
                username: {
                    label: "Username:",
                    type: "text",
                    placeholder: "your-cool-username"
                },
                password: {
                    label: "Password:",
                    type: "password",
                    placeholder: "your-awesome-password"
                }
            },
            async authorize(credentials) {
                // This is where you need to retrieve user data
                // to verify with credentials
                // Docs: https://next-auth.js.org/configuration/providers/credentials

        const user = { id: "001", name: "nextjsdev", password: "12345678" }

        if (credentials?.username === user.name && credentials?.password ===
           user.password) {
                    return user
                } else {
                    return null
                }
            }
        })
    ],
}Note: Here I have added dummy credentials to test our application, but in a real production-ready app, you will be fetching the user data from a database or API and filtering over the data to match with the user-entered credentials.
You might be getting some error about the environment variables, so let’s fix that.
Now create a .env.local file in the root of the directory at the same level as the package.json file.
Inside the .env.local file add these environment variables:
NEXTAUTH_SECRET=YOUR_NEXTAUTH_SECRET
GITHUB_SECRET=YOUR_GITHUB_SECRET
GITHUB_ID=YOUR_GITHUB_IDSo, to generate the NEXTAUTH_SECRET, open your terminal in VsCode choose the Bash terminal (It won’t work in cmd), and run the below given command to generate a random 32-character long string.
openssl rand -base64 32The Github Secret and ID if for implementing the Github OAuth.
So, visit your GitHub profile, click on your profile, and choose the settings tab. After the settings page is open, scroll down to the last option and choose developer settings.
Open the developer setting and choose OAuth Apps. Generate a new OAuth App and fill in the following details per the screenshot.
Settings > Developer Settings > OAuth Apps
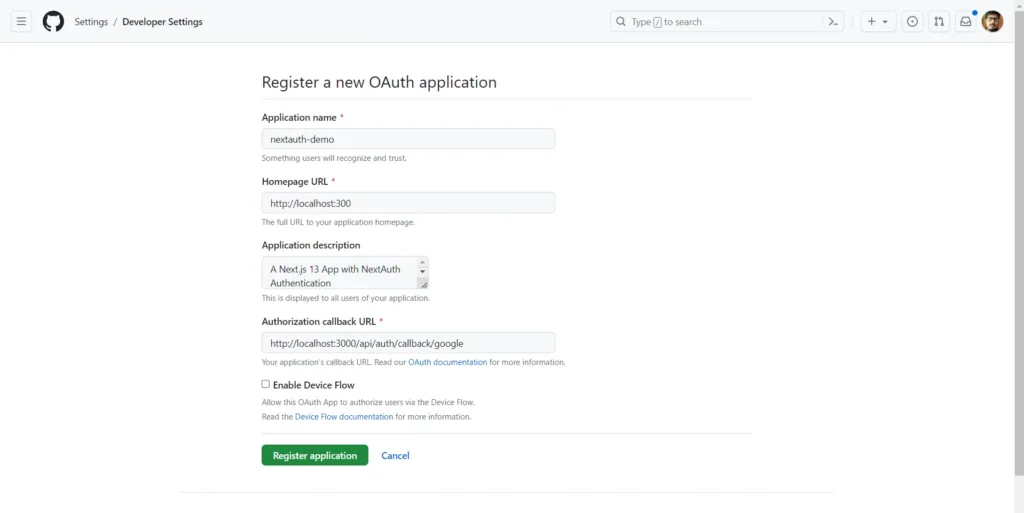
After you register for the application, you will see your GitHub Client ID and Github Secret, Copy those two and paste them into the .env.local file like this:
NEXTAUTH_SECRET=vvcLZNsiBz35zP6E0aAawdRYD+MDPqEQ0aS0mwtyCkw=
GITHUB_SECRET=46a2417bcad819e521Ai4915767e316b13312c28
GITHUB_ID=d2a67f47f67277230408Note: Please Add your GitHub Client ID and Github Secret These are not my original Environment variables, so do not copy them. I have pasted them just to show you, how it would look like inside the .env.local file.
So you need to paste Your GitHub Secret and ID and after that save the file and close it.
After all that, the folder structure will look like this:

Now open your terminal and start the development server by running the following command.
npm run devYou will see a simple home page with the text “You Are Not Authenticated !!”.
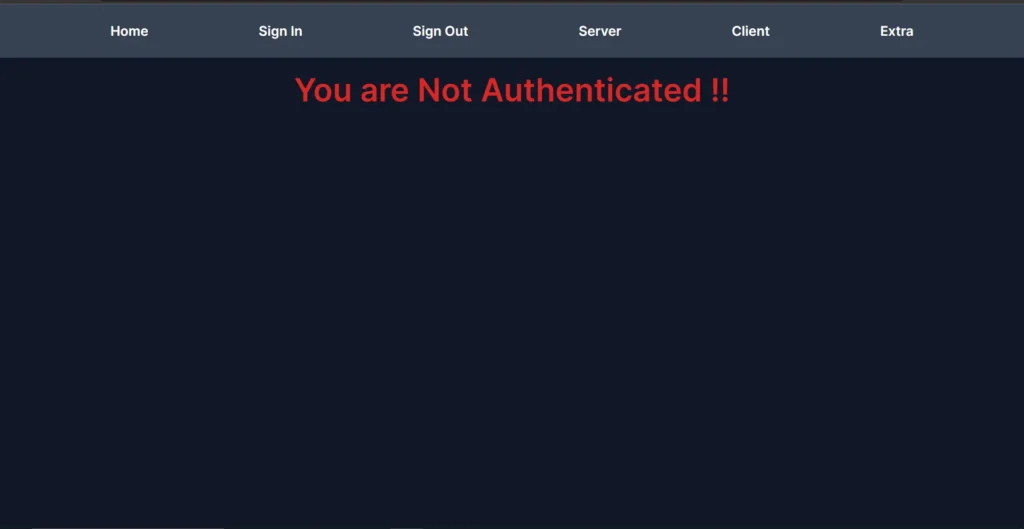
We have implemented the Authentication, but to test it we need to create some pages and components to test it.
Creating Components for Our App
Before we delve into the authentication implementation, let’s establish foundational components and pages within our Next.js 13 App, to test the authentication.
There are three different ways we can authenticate users based on :
- Client Side (Whether we want to authenticate our users on the client side)
- Server Side ((Whether we want to authenticate our users on the server side)
- Using Middleware to protect the whole app or selected routes of our application.
Note: We will discuss the Middleware in step 4.
So, let’s create these components
1. Components
- Navbar Component
- UserCard Component
2. Client-Side Component
3. Server-Side Component
4. Simple Page Component
These components will be seamlessly integrated into various pages within our application. This enables us to thoroughly assess the effectiveness of NextAuth Authentication.
Create 4 folders inside the app folder (Not inside the api folder be careful ) and name those folders respectively as components, server, client, and extra.
Inside components/Navbar.tsx
import Link from "next/link"

export default function Navbar() {
    return (
     <nav className="flex items-center w-full bg-gray-700 h-[80px]">
      <ul className="flex justify-evenly text-xl font-semibold text-white w-full">
                <li><Link href="/">Home</Link></li>
                <li><Link href="/api/auth/signin">Sign In</Link></li>
                <li><Link href="/api/auth/signout">Sign Out</Link></li>
                <li><Link href="/server">Server</Link></li>
                <li><Link href="/client">Client</Link></li>
                <li><Link href="/extra">Extra</Link></li>
        </ul>
      </nav>
    )
}Inside components/UserCard :
import Image from "next/image"

type User = {
    name?: string | null | undefined;
    email?: string | null | undefined;
    image?: string | null | undefined;
} | undefined

type Props = {
    user: User,
    pagetype: string,
}

export default function Card({ user, pagetype }: Props) {

    //console.log(user)

    const greeting = user?.name ? (
        <div className="flex flex-col items-center p-6 bg-white rounded-lg font-bold text-5xl text-black">
            Hello {user?.name} !
        </div>
    ) : null

    const emailDisplay = user?.email ? (
        <div className="flex flex-col items-center p-6 bg-white rounded-lg font-bold text-5xl text-black">
            {user?.email}
        </div>
    ) : null

    const userImage = user?.image ? (
        <Image
            className="border-4 border-black dark:border-slate-500 drop-shadow-xl shadow-black rounded-full mx-auto mt-8"
            src={user?.image}
            width={200}
            height={200}
            alt={user?.name ?? "Profile Pic"}
            priority={true}
        />
    ) : null

    return (
        <section className="flex flex-col gap-4">
            {greeting}
            {emailDisplay}
            {userImage}
            <p className="text-2xl text-white text-center">{pagetype} Page!</p>
        </section>
    )
}Note: To Authenticate users on the client side we need to wrap your application with AuthProvider, so that we can use the UseSession hook.
To create a new folder inside the app folder, name it context, and inside it create an AuthProvider.tsx file
Inside context/AuthProvider.tsx file:
'use client'

import { SessionProvider } from 'next-auth/react'

export default function AuthProvider({ children }: {
    children: React.ReactNode
}) {
    return (
        <SessionProvider>
            {children}
        </SessionProvider>
    )
}After creating the AuthProvider, navigate to layout.tsx file and wrap the whole application with it, so that we can access the useSession Hook in every Client component of our application. (For the Server component we can directly use the getServerSession hook from the “next-auth/next” package.)
Inside layout.tsx file:
import './globals.css'
import { Inter } from 'next/font/google'
import Navbar from './components/Navbar'
import AuthProvider from './context/AuthProvider'

const inter = Inter({ subsets: ['latin'] })

export const metadata = {
  title: 'NextAuth Tutorial',
  description: 'User Authentication in Next.js 13 App using NextAuth',
}

export default function RootLayout({
  children,
}: {
  children: React.ReactNode
}) {
  return (
    <html lang="en">
      <body className={inter.className}>
        <AuthProvider>
          <Navbar />
          <main className="flex justify-center items-start p-6 h-[calc(100vh_-_80px)] bg-gray-900">
            {children}
          </main>
        </AuthProvider>
      </body>
    </html>
  )
}After that create a page.tsx file inside the rest of the folder (client, server, and extra).
Inside client/page.tsx:
'use client'

// Remember you must use an AuthProvider for
// client components to useSession

import { useSession } from 'next-auth/react'
import { redirect } from 'next/navigation'
import UserCard from '../components/UserCard'

export default function ClientPage() {
    const { data: session } = useSession({
        required: true,
        onUnauthenticated() {
            redirect('/api/auth/signin?callbackUrl=/client')
        }
    })

    return (
        <section className="flex flex-col gap-6">
            <UserCard user={session?.user} pagetype={"Client"} />
        </section>
    )
}Inside server/page.tsx:
import { options } from "../api/auth/[...nextauth]/options"
import { getServerSession } from "next-auth/next"
import UserCard from "../components/UserCard"
import { redirect } from "next/navigation"

export default async function ServerPage() {
    const session = await getServerSession(options)

    if (!session) {
        redirect('/api/auth/signin?callbackUrl=/server')
    }

    return (
        <section className="flex flex-col gap-6">
            <UserCard user={session?.user} pagetype={"Server"} />
        </section>
    )

}Inside extra/page.tsx:
export default async function ExtraPage() {
  return (
    <h1 className="text-4xl text-center max-w-2xl leading-normal font-semibold text-white">
     Some Extra Page!,which is not protected yet but can be protected using the Middleware.
    </h1>
  );
}Also update the code inside the app/page.tsx file:
Inside app/page.tsx :
import { options } from "./api/auth/[...nextauth]/options"
import { getServerSession } from "next-auth/next"
import UserCard from "./components/UserCard"

export default async function Home() {
  const session = await getServerSession(options)

  return (
    <>
      {session ? (
        <UserCard user={session?.user} pagetype={"Home"} />
      ) : (
        <h1 className="text-5xl text-red-600 font-semibold">
        You are Not Authenticated !!
      </h1>
      )}
    </>
  )
}Upon crafting these essential components, access your terminal within the VsCode environment and initiate the development server using this command:
npm run devThe outcome will present a basic application showcasing four distinct pages:
- Home Page
- Client-Side Page
- Server-Side Page
- Extra Page
Your Folder Structure would look like this:

Now you will see that, you can see the Home Page and the Extra page, whether you are authenticated or not.
But if you try to visit the Server (/server) and Client (/client) routes, you will be redirected to the Sign-In Page and you will need to provide the credentials
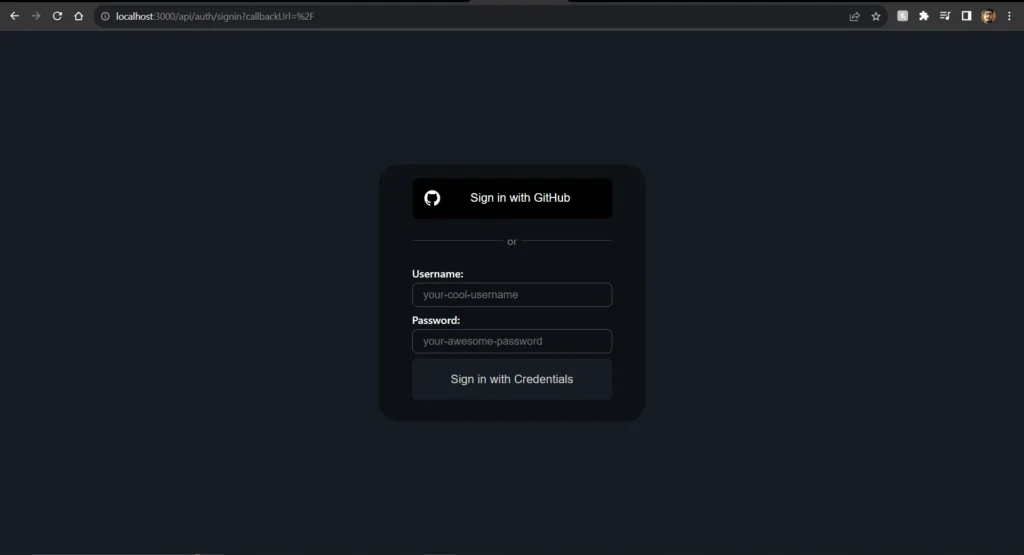
Note: (For now provide only those credentials that we hardcoded in the options.ts file since we are developing locally).
But in the case of production mode, we will have to fetch the user’s data from a database or an API and need to match those credentials with the user-entered credentials.
Implementing the Middleware
So, you might be thinking that, if want to protect routes or specific pages of your applications, you need to use the useSession or getServerSession hook based on what type of component is (Client or Server).
But what if I tell you, that there is an easy way to this, and you can apply authentication to your entire application and that can be done using Middleware.
Middleware is a special feature of Next.js. Middleware allows you to run code before a request is completed. Then, based on the incoming request, you can modify the response by rewriting, redirecting, modifying the request or response headers, or responding directly.
So to apply this feature, create a file with the name middleware.ts at the same level as your app folder (Not inside the app folder) and paste this online code, and your whole application is now protected.
Inside the middleware.ts file:
// Without a defined matcher, this one line applies next-auth
// to the entire project

export { default } from "next-auth/middleware"Now, if you try to visit the Home Page or the Extra page, you will be redirected to the signIn page.
You might wonder if that, would it be possible to apply middleware only on some selected routes and not on the whole application. Like you want any user can access the Home Page whether he is authenticated or not but cannot visit the client, server, or the extra page if not authenticated.
Yes, you can do this, by using the matcher function provided by NextAuth.
Inside the middleware.ts file, add this line of code:
// Without a defined matcher, this one line applies next-auth
// to the entire project

export { default } from "next-auth/middleware"

// Applies next-auth only to matching routes - can be a regex
// Ref: https://nextjs.org/docs/app/building-your- application/routing/middleware#matcher

export const config = { matcher: ["/extra", "/client","/server"] }Sorry guys, but you will still face an unexpected error, I also forgot about this and found out later. The error was regarding the Next.js Image, actually, we have to define the URL of the external images in the next.config.ts file.
Paste the below code inside your next.config.ts file:
/** @type {import('next').NextConfig} */
const nextConfig = {
    images: {
        remotePatterns: [
            {
                protocol: 'https',
                hostname: 'avatars.githubusercontent.com',
                port: '',
                pathname: '/u/**',
            },
        ],
    },
}

module.exports = nextConfig
Testing User Authentication in Next.js 13 App using NextAuth
To ensure the functionality of our application, let’s put our user authentication to the test. Simply navigate to the “SignIn” tab and enter your credentials to sign in. Alternatively, you can also opt for GitHub OAuth for a seamless sign-in experience.
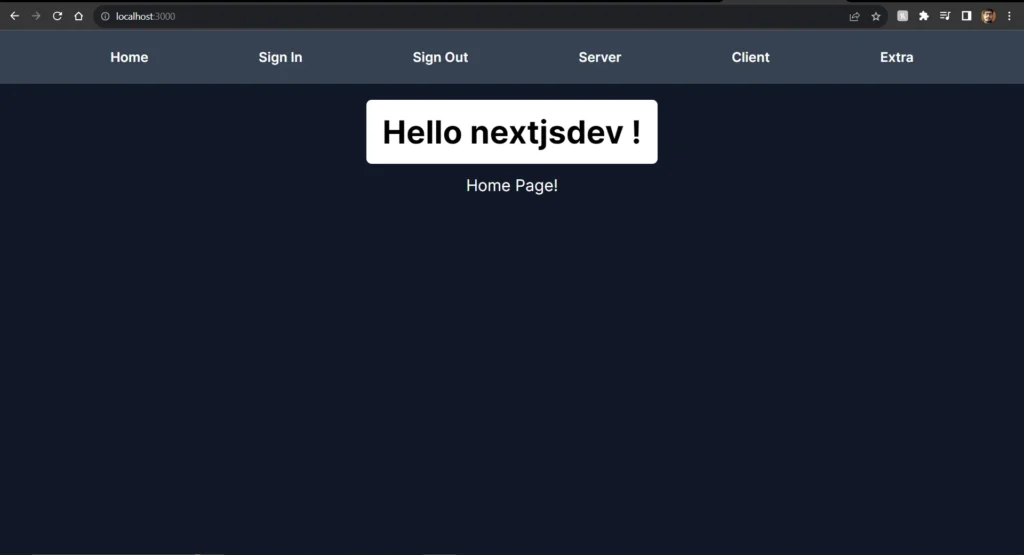
Once you’ve successfully authenticated, a world of possibilities opens up. You’ll gain access to the protected pages within the application, and if you prefer, you can also sign in using your GitHub account.
Below, we’ll provide a visual representation of how these pages appear in both scenarios
Auth with Credentials (Username and Password):
Auth with GitHub OAuth:

Now everything is done, and that was quite a work we have done. Kudos to you, if you are still there and building this project with me.
Now you have learned how to implement User Authentication in Next.js 13 Application using NextAuth.
Conclusion
So that was everything related to User Authentication in Next.js 13 App using NextAuth. I trust you appreciated this and relished creating the project.
In case you encounter any obstacles and can’t locate the solution, you can explore my finished repository available at this location.
I extend gratitude for investing your time in perusing this article. If you found this tutorial helpful, I encourage you to distribute it on Twitter and Facebook or any other social platform you prefer and kindly mention me in your posts.
Some Useful Link:
Connect with me:

Pretty good tutorial, and very recent. Let em try follow it. thank you
Thank you so much for your appreciation, i am glad you find the tutorial helpful.
This tutorial is the same of another in YouTube do it for another person
Yes, you are right It from Dave’s Gray YouTube Channel, but I saw that Dave did not provided any written material for it, so I thought of writing a blog post tutorial, I have not copied his tutorial, i also followed his tutorial to create my own project.
Excellent weblog right here! Additionally your
website quite a bit up fast! What web host are you the use
of? Can I am getting your associate link in your host?
I want my site loaded up as quickly as yours lol
Here is my blog :: LABORKITTEL